Installation
Our online product is easy to install for you, or a professional. The paper is water-activated, so there's no need for paste.
Simply use our How-to video in conjunction with our step-by-step guide below, which shows you everything you need to know.
A PDF of these instructions can be downloaded here and a copy will be included with your order.
If you'd like us to recommend an installer in your area who can measure up or install your Arenaroom,
please call us on +44 (0) 203 935 7090 or email us at ben@arenaroom.com.
We also offer a more personal 1-to-1 ordering service, including measurement and installation options, and 2 further wallpaper finishes to choose from. Please call us on +44 (0) 203 935 7090 or email us at ben@arenaroom.com to discuss.
Roboto
Before you start
- Read through these instructions carefully to plan your installation as Arenaroom cannot be held responsible once you’ve begun installing
- Ensure the walls are smooth, dry and clean from any wallpaper, paint whitewash and ink or any other surface contaminants such as grease, dirt, polish and pen marks. Use detergent solution to remove any of the above
- Any undulations or dents should be filled and any high spots should be sanded flat, flush to the wall
- If you're ordering online, our Arenaroom wallpaper can be applied to any wall you like except Foamalux or Foamex or similar branded flexible board. As this product is pre-pasted, no additional adhesive is required. We advise applying a coat of primer before wallpapering. If you’re walls have dark paint, we advise you paint over with a light colour paint so nothing shows through. Paint over patches of plaster with a light colour paint too. Add the primer once dry.
You will need
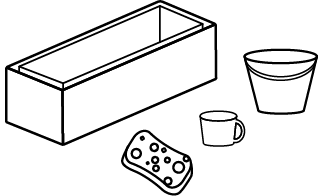
- Waterproof dustsheet (included if you select Add Tools)
- Decorator's sponge (included if you select Add Tools)
- Trimming aid (included if you select Add Tools)
- Plumb bob (included if you select Add Tools)
- Decorator's knife
- Tape measure
- A friend is also helpful!
1. Protect your room
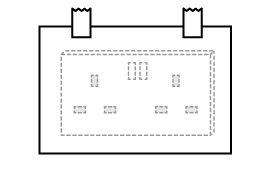
Protect the room by covering the floor with the plastic dustsheet, tucking it into the corners. Then tape a waterproof material over any electricals, like light switches and plug sockets, as well as windows and doors.
2. Building your Arenaroom bathbox
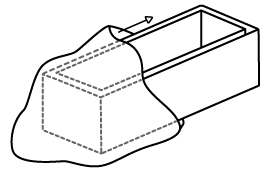
Remove the wallpaper from the box. Place the inner box inside its up-turned lid to create a reinforced double cardboard trough. Place this box inside the plastic bag provided and half fill the box with water.
Do not move your bath box once filled with water.
3. Preparation
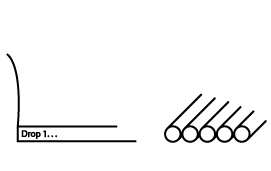
Your wallpaper will arrive numbered, and in order of installation. Roll up the drops print side in, and arrange them in numerical order. You should start with Drop 1 at the far left of your Wall 1 and install from left to right around the room. Remember, you will know which is Wall 1 as you will have marked Wall 1, or taken a picture of it, when you planned and measured your Arenaroom.
4. Wet the paper
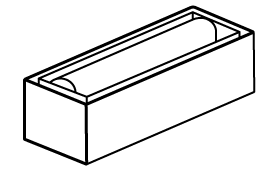
Thoroughly soak Drop 1 in the bath box for 15 seconds.
If you’d rather not use the bath box you can simply spray the back of the paper with clean water. DO NOT wipe the back of the paper as you may wipe the adhesive off.
5. Booking
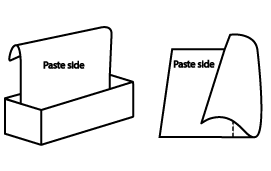
Holding the two top corners, lift the paper out of the bath box, allowing it to un-roll and lay it out on the floor, paste side “up”. Check the paper is thoroughly coated in water, enabling the paste to activate. Fold the paper in half, paste side to paste side, taking care not to crease the paper. This is known as “booking”. Leave the paper like this for 1 minute.
6. Soak the wall
Whilst your paper is booking, use a sponge and thoroughly soak the wall area that you are about to fit your sheet to. Please note that the wetter the wall, the better.
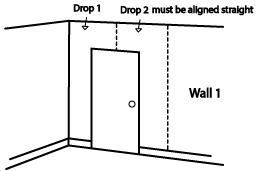
7. Hanging the paper (Drop 1)
Drop 1 is to be hung on the far left of Wall 1. So, remembering which wall is your Wall 1, prepare to hang Drop 1.
If your Drop 1 is to be hung around a door, please go to Step 9.
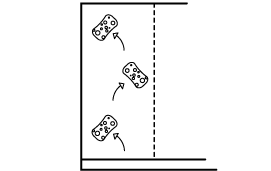
The first full drop on every wall must be aligned dead straight. So first, measure the width of Drop 1. Then make a mark at the top of the wall that same distance from the corner. Hang the plumb bob on that mark and make further marks along the plumb bob line, down to the floor.
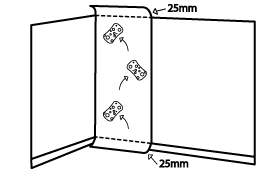
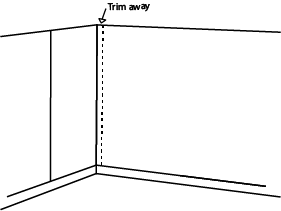
Hang the Drop 1, tucking it into the corner and top of the wall. Then unfold the bottom half of the paper. Position the right side of the drop so it aligns with the marks. If you’ve added "Trim" with your order (which we strongly recommend), make sure to leave 25mm of excess paper at the top and bottom of the wall. Sponge out any bubbles or wrinkles in the paper.
Use the trimming aid to push the paper neatly into the top, bottom and the corner, then trim away the excess paper.
8. Hanging the paper (continued)
Repeat Steps 4 - 6 for Drop 2.
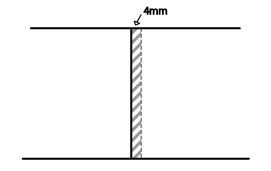
Hang Drop 2 so it perfectly matches up with the previous image on Drop 1. The left side of the right Drop 2 should overlap the right side of Drop 1 by approximately 4mm. This overlap is designed to remain on the wall. Sponge out any bubbles or wrinkles and trim the excess off the second drop at the top and bottom of the wall, as you did with the first.
Repeat these steps with the next drops, until you come to a corner.
9. Hanging Drop 1 around a door
If your Drop 1 is to be hung around a door, start by positioning the paper into the corner of the wall. If you added "Trim" to your order (which we strongly recommend), ensure you leave approximately 25mm of excess paper at the top and bottom of the wall. Line up the paper into the corner, making sure it’s straight. Cut around the door architrave, leaving roughly 50mm of excess paper. This makes the final trim easier to deal with. Now push the paper into the door architrave, then use the trimming aid to get it tight into the corners. Trim away the excess paper, ensuring you make the cut on the architrave side of the trimming aid. Finally, trim away any excess paper from the top and bottom of the wall.
The first drop with a full-length right edge of paper (i.e. Drop 2) must be aligned dead straight. So first, measure the width of Drop 2. Then subtract 4mm (the overlap distance) and make a mark at the top of the wall, that distance from Drop 1. Hang the plumb bob on that mark and make further marks along the plumb bob line, down to the floor.
Position the right side of Drop 2 so it aligns with these marks. If you added Trim, make sure to leave excess paper of about 25mm at the top and bottom of the wall. Again, cut around the door architrave, leaving roughly 50mm of excess paper. Push the paper into the architrave, then use the trimming aid to get it tight into the corners. Trim away the excess paper, ensuring you make the cut on the architrave side of the trimming aid.
After sponging out the bubbles, use the trimming aid to push the paper neatly into the top, and bottom, then trim away the excess paper.
10. Hanging the paper (continued)
Repeat Steps 4 - 6 on the next drops, making sure you align the next drops so the image matches up perfectly with the previous drop you hung. Remember, the left side of the right drop overlaps the right side of the left drop by about 4mm. The overlap is designed to remain on the wall - it's not meant to join at the edges or to be trimmed. Continue hanging the drops following the same steps until you reach a corner.

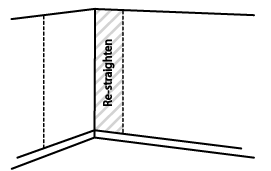
11. Hanging around a corner
When you reach a corner, use the sponge to spread the drop into and around the corner. When a drop goes around the corner of the room, again we need to re-straighten. So, measure from the corner to the right hand side of the drop at the top and bottom. If they are not the same width, make a note of the smallest measurement, then using your knife and trimming aid make a cut down the corner (to the right hand side of the trimming aid) and remove the section of the wallpaper to the right hand side of the cut. Book the paper on the floor to keep the adhesive activated. Then make a mark at the top of the wall of the measurement you noted down. Attach the plumb bob on that mark and make further marks down to the floor. Then re-position this section onto the wall lining the right edge up with the plumb bob marks (and ensuring the grass is at the same height). Trim away the excess paper at the top and bottom and on the left edge of the wall, to the left of the trimming aid, removing the thin excess strip.
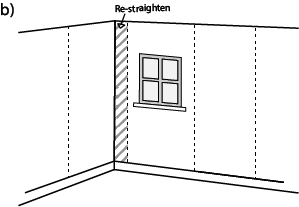
12. Hanging around a corner (with feature)
If the drop that you’re hanging around a corner overlaps a door or window situated just around that corner, then do not re-straighten this drop. Instead, re-straighten the next drop that has a full-length, floor-to-ceiling, right side.
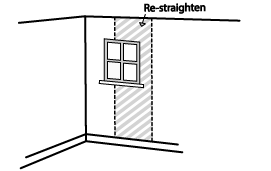
13. Hanging around a corner (no feature)
If the drop you’re hanging around the corner does not reach a door or window situated just around that corner, then re-straighten this drop as usual.
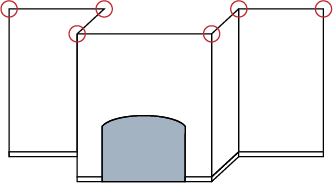
14. Awkward room features - windows
Start by hanging the drop over the window as usual, overlapping the previous sheet and aligning the stadium perfectly. Sponge out any bubbles or creases. Use the trimming aid to push the paper into the side of the window sill, then make a small vertical cut where the sill meets the wall. Trim along the top edge of the sill to about 5cm in from the left edge. Then make a diagonal cut from the 5cm point down to the bottom of the original vertical cut. Sponge out creases and bubbles.
Use the trimming aid to push and tuck the paper in neatly at the edge and under the sill. Trim away the excess paper above the trimming aid around the sill and at the bottom of the wall. Sponge out any bubbles or creases around the window, then trim carefully along the top edge of the window frame and down the left side, down to the sill. Sponge away any bubbles or creases and trim away the excess paper at the ceiling.
Hang the next sheet of paper over the window as you normally would, overlapping the previous drop and aligning the stadium exactly. Then repeat the same process as for the previous drop.
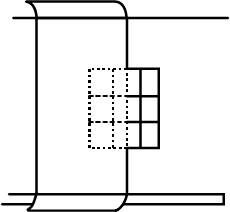
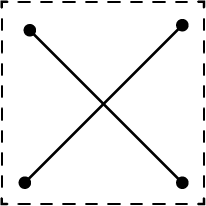
15. Awkward room features (plugs/switches)
Hang the wallpaper over any plug sockets or switches. Press the wallpaper into the corner points to make indentations in the paper. Then using these marks as a start point, make a cut from corner to corner, like an “X”. Push the wallpaper over the plug socket or switch and use your fingers or sponge to smooth out the paper and remove any creases or bubbles. Using the trimming aid, make cuts along the outside edges of the trimming aid all around the plug socket or switch.
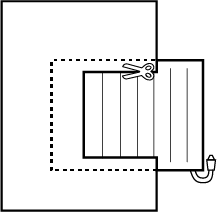
16. Awkward room features - radiators
Allow the wallpaper to hang in front of the radiator. Make a cut to the wallpaper that is the shape of the radiator but about 10cm smaller than the radiator. Smooth the wallpaper down behind the radiator to give you a perfect neat finish.
17. Awkward features - alcoves/chimneys
When wallpapering around alcoves / chimneys, to ensure it's perfectly aligned, re-straighten at every corner. See Step 11 - Hanging around a corner.
18. The final drop on a 4 wall Arenaroom
If you have ordered a full, 360°, 4 wall Arenaroom, the last drop you install may not perfectly join with the first drop. This is because whilst your 360° wallpaper has been designed to fit your space exactly, uneven walls and misaligned rooms mean we have had to add extra paper to your room size. When you hang the final drop, spread the drop into the corner using your sponge then make your final cut using your knife and trimming aid, ensuring you make the cut to the right hand side of your trimming aid.
19. Tidying up
Do not attempt to lift and move the bathbox while full of water. Use a sponge or cup to remove any excess water in the Arenaroom Bathbox first. Then throw away the bathbox and any cuttings.
20. Removing the paper
If you would like to remove the wallpaper at any time, completely wet all the drops you want to remove with a sponge. Leave for a minimum of 5 minutes to soak in. Then, starting at a corner, slowly pull away the drop from the wall. If it starts to tear, stop and apply more water to the back of the drop. Remove any residue with a damp sponge. Please note, the wallpaper is not re-appliable once removed.