Plan & Measure
Our unique room planner technology means the stands will always scale to fit your walls (corner flags will be in the corners and goals centered on the walls). However before using the room planner, it's important to plan and measure your Arenaroom correctly.
Please follow our simple step-by-step guide below (or download the guide here), which will take you through the planning and measuring process.
If you have any questions or would like us to recommend an installer to measure up your space
please call us on +44 (0) 203 935 7090 or email us at ben@arenaroom.com.
We also offer a more personal 1-to-1 ordering service, including measurement and installation options, and 2 further wallpaper finishes to choose from. Call us on +44 (0) 203 935 7090 or email us at ben@arenaroom.com.
Please also read our Terms of service so you are aware of your responsibilities.
Roboto
1. Planning your Arenaroom
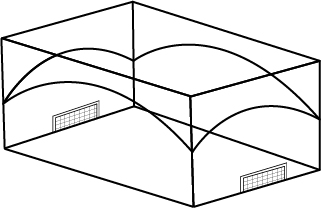
1, 2, 3 or 4-wall Arenarooms all look fantastic. So the first thing to decide is how many walls you want to wallpaper and then, what stands you want to put on what walls.
Most rooms are rectangular, lending themselves nicely to the shape of a stadium. If you are wallpapering 2, 3 or all 4 walls of your room, then your two opposite, longer, walls will naturally be more suited for the longer, side stands of the stadium. And your two opposite shorter walls will be the shorter end stands (with the goals, if it’s a football stadium).
If you’re wallpapering 1 wall, then of course you can choose to put whichever stand you want on it.
For squarer rooms, don’t worry, our designers have made sure your Arenaroom will still look great!
2. Where to start your Arenaroom
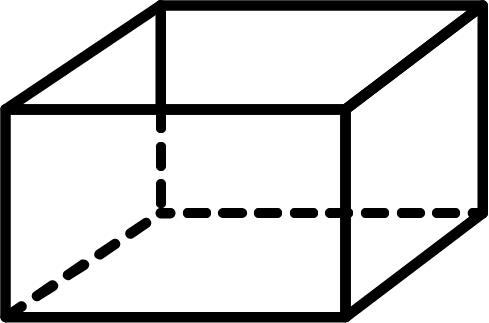
Once you’ve decided which stands you want to put on which walls, you need to choose which of those stands should be Wall 1 on our preview planner, i.e. where your Arenaroom installation will start;
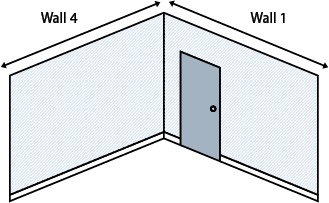
If you’re ordering a 4-wall (full 360°) Arenaroom, Wall 1 will start in the corner where Wall 4 finishes. This corner should be the starting point for your installation of Wall 1. No matter how precise your measurements, the final join where Wall 4 meets Wall 1, may not be quite perfect (by a few cms). Therefore this final join is best made at the corner nearest a large feature, preferably the door. If your door is on the far left of a particular wall in the room, we suggest you make this Wall 1. If your door is on the far right hand side of a particular wall, we recommend you make this Wall 4, and the wall on the immediate right of this wall becomes Wall 1.
If you are ordering a 3-wall Arenaroom, the 3 walls (or stadium stands) you’ve chosen will always connect with each other. So when entering the 3 walls into the preview planner, treat them as a row of 3 connected walls and position them left to right, starting with the left of the three walls as Wall 1, the middle as Wall 2, and the right of the three as Wall 3.
If you are ordering a 2-wall Arenaroom and your two walls are two stands that adjoin one another, make them Wall 1 and Wall 2 in the preview planner, running left to right. If your two walls are of stands that face each other, you can place them wherever you want in the preview planner.
If you are ordering a 1-wall Arenaroom, simply make this Wall 1 in the preview planner.
When you come to enter the wall sizes into the preview planner or when you come to install your Arenaroom, you will need to remember which is Wall 1. So we suggest you take a photo of Wall 1 or mark it with a sticky note.
3. Measuring your Arenaroom
It’s very important to measure your walls correctly. There’s a saying we use here - “Measure twice, print once!”.
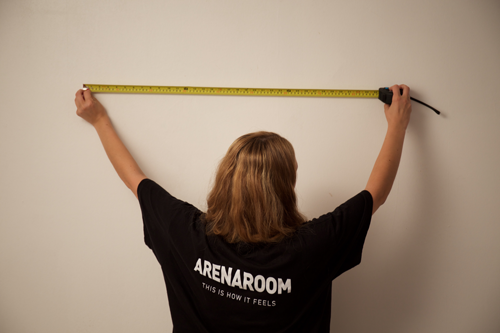
Before you start, you’ll need a tape measure, a pen and some paper to note down measurements as you go.
A friend would also make things a little easier!
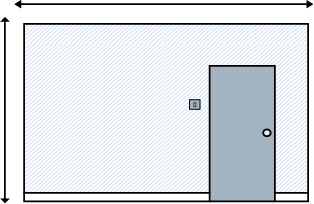
In order to create your Arenaroom, you will need to measure the width and height of the walls you wish to cover (measured at the tallest and widest points). See sections 4 and 5 below.
We have a conversion calculator for both metric and imperial dimensions, so use whichever unit of measurement you are most comfortable with. Remember, we only need the dimensions for the surfaces you wish to cover, not including any skirting boards or coving.
We have a conversion calculator for both metric and imperial dimensions, so use whichever unit of measurement you are most comfortable with. Remember, we only need the dimensions for the surfaces you wish to cover, not including any skirting boards or coving.

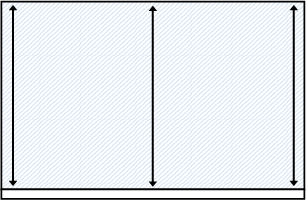
4. Measuring the height of your walls
The height of a wall can differ slightly from side to side, and we need the highest point. So simply measure the height of the left hand side, the centre and the right hand side of the wall and note the largest measurement.
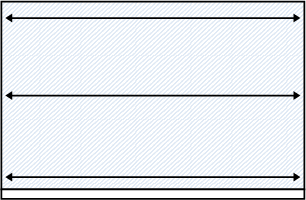
5. Measuring the width of your walls
The width of a wall can also change slightly from top to bottom so to find the widest point simply measure the width of each wall at the top, centre and bottom and take a note of the largest measurement.
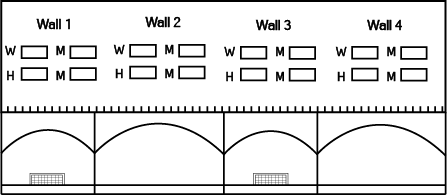
6. Input your measurements into the room planner
Enter the heights and widths of the walls you're covering into the room planner, remembering which wall you chose to be Wall 1. The planner will automatically fill in all heights, once you’ve entered the first height, to speed things up. It will also automatically update all heights to the highest wall height you enter. Use the +/- button to remove the walls you're not covering.
7. Awkward features - alcoves/chimneys
Measure the chimney and alcove wall as if it's just one width measurement. Measure left to right of the alcove then measure the depth of the fireplace recess. Measure the face front of the fireplace then measure the depth of the recess and the width of the alcove. Add all 5 measurements together and input your total width measurement as one width wall.

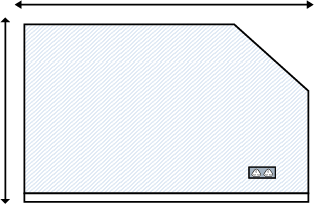
8. Awkward spaces - sloping walls
Always measure the width and height of the walls. When there is a sloped ceiling or wall, be sure that you measure the longest and widest parts only, ignoring any slopes. To avoid errors made when measuring slopes we provide the Arenaroom wallpaper as a whole rectangle or square, and the slope is cut away during installation.
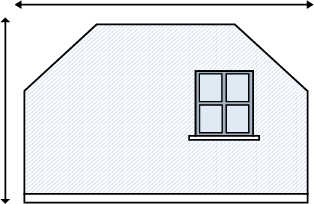
9. Awkward spaces - pitched rooves
If your wall has two slants, simply identify and measure the longest part of the wall in both the width and the height. Again, we will produce your Arenaroom wallpaper as a square or rectangle, with cutting away required during installation.
10. Walls with obstacles
When there is a door, window or some other obstacle on your wall, only measure the total width and height, as the obstacle will simply be cut away from the installation..